Create Impressive PDFs With iOS Automation
13 Nov 2015I love iOS automation. There are so many amazing possiblities.
In a previous post, I detailed an Impressive Google Docs workflow I created using Drafts, Markdown and Google Fonts.
Clever, flexible Google Doc action (with good write up) from @techstreams: http://t.co/b42FNKIgvP
— Drafts (@draftsapp) October 2, 2015Combining a modified version of this original Drafts action with an action extention workflow developed with the Workflow app, I’m now able to create Impressive PDFs.
Interested? Read on.
How To Create Impressive PDFs
… with Drafts, Markdown, Google Fonts and Workflow

STEP 1
Install the following apps on your iOS mobile device:
For more on Drafts see iOS Automation with Drafts.
For more on Workflow see iOS Automation with Workflow.
STEP 2
After app installation:
-
Install the Impressive PDFs Drafts Action from the Drafts Action Directory
-
Install the HTML to PDF workflow
Ensure that there are no other workflows with the name HTML to PDF resident within the Workflow app or you may encounter an issue.
STEP 3
Enter document content into Drafts using markdown.
Looking for an example? Try this markdown:
For an introductory markdown tutorial, see Simplify Writing with Markdown.
For more on editing in Drafts, see the Basics of Navigating Drafts.
If you need better document element separation/spacing, use the <br> line break tag between elements when creating your markdown content. To assist, I’ve created a convenient <br> Drafts Key which can be installed from here.
STEP 4
In Drafts, run the installed Impressive PDFs Drafts Action on the completed markdown content.
See the Basics of Navigating Drafts for more information on running Drafts Actions.

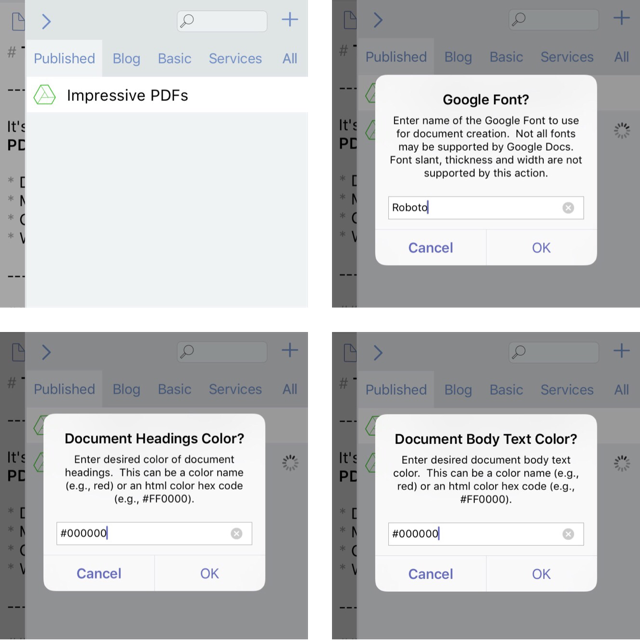
When the action runs, you’ll be prompted for three items:
1) Google Font to use for document styling
Enter the desired Google Font name or leave the default Roboto font.
In addition to Roboto, here are a few of my other favorite fonts:
Not all Google Fonts may be supported.
Google Font thickness, slant and width are not supported by this action.
2) Document headings color
Enter the name of a color (e.g., red) or an html color hex code (e.g., #FF0000 for red). Leave #000000 for the default color black.
Document headings are created with markdown. See the Simplify Writing with Markdown post for additional information.
3) Document body text color
Enter the name of a color (e.g., red) or an html color hex code (e.g., #FF0000 for red). Leave #000000 for the default color black.
After completing each prompt:
- Press the OK button to continue
- Press the Cancel button to exit and return to Drafts
STEP 5
The Impressive PDFs Drafts Action will now automatically pass the document content to the HTML to PDF workflow to create the PDF.

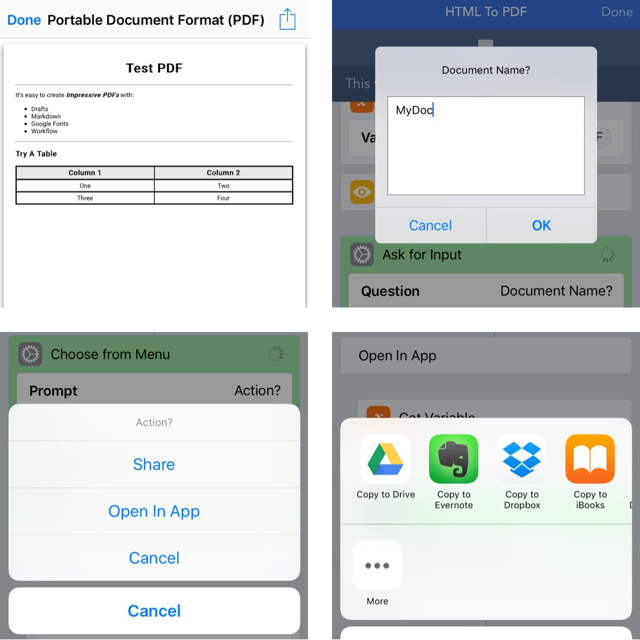
When the workflow runs:
1) A Preview will display once PDF generation is complete
Click the Done link in the top left corner to continue.
2) You will be prompted for a name for the generated PDF
Enter a new name or leave the default value.
Press OK to continue. Press Cancel to exit the workflow and return to Drafts.
3) An Action prompt will display
- Share: select to share PDF (e.g., email, message, …)
- Open In App: select to open PDF in another app (e.g., Google Drive, Evernote, Dropbox, iBooks, …)
- Cancel: cancel workflow
You will be returned to Drafts once the workflow is complete.